Deep Dive into Optics: Clear Aperture

Aug. 9, 2022

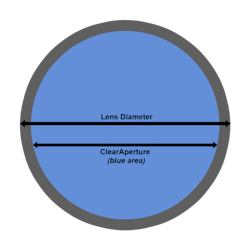
During the manufacturing process, a lower quality surface near the edge of an optical component is created. The diameter of the area inside of the optical component that must meet optical requirements (such as surface quality, surface accuracy, coating, etc.) is called the clear aperture. Due to manufacturing constraints, it is impossible to produce a clear aperture exactly equal to the entire size of the optical component.

Clear aperture can be expressed in a measurement such as millimeters or as a percent of the overall surface area of the lens. For example, a lens diameter might be 186mm and the clear aperture 180mm or 96.7%.

In general, the great the clear aperture of an optical component, the more difficult it is to produce because the required specifications must be pushed out closer to the physical edge of the optic. There are different manufacturing tolerances that determine the optical component quality.
Sponsored Recommendations

Request a free Micro 3D Printed sample part

April 11, 2024
The best way to understand the part quality we can achieve is by seeing it first-hand. Request a free 3D printed high-precision sample part.

How to Tune Servo Systems: The Basics

April 10, 2024
Learn how to tune a servo system using frequency-based tools to meet system specifications by watching our webinar!

Motion Scan and Data Collection Methods for Electro-Optic System Testing

April 10, 2024
Learn how different scanning patterns and approaches can be used in measuring an electro-optic sensor performance, by reading our whitepaper here!

How Precision Motion Systems are Shaping the Future of Semiconductor Manufacturing

March 28, 2024
This article highlights the pivotal role precision motion systems play in supporting the latest semiconductor manufacturing trends.

Voice your opinion!

To join the conversation, and become an exclusive member of Laser Focus World, create an account today!